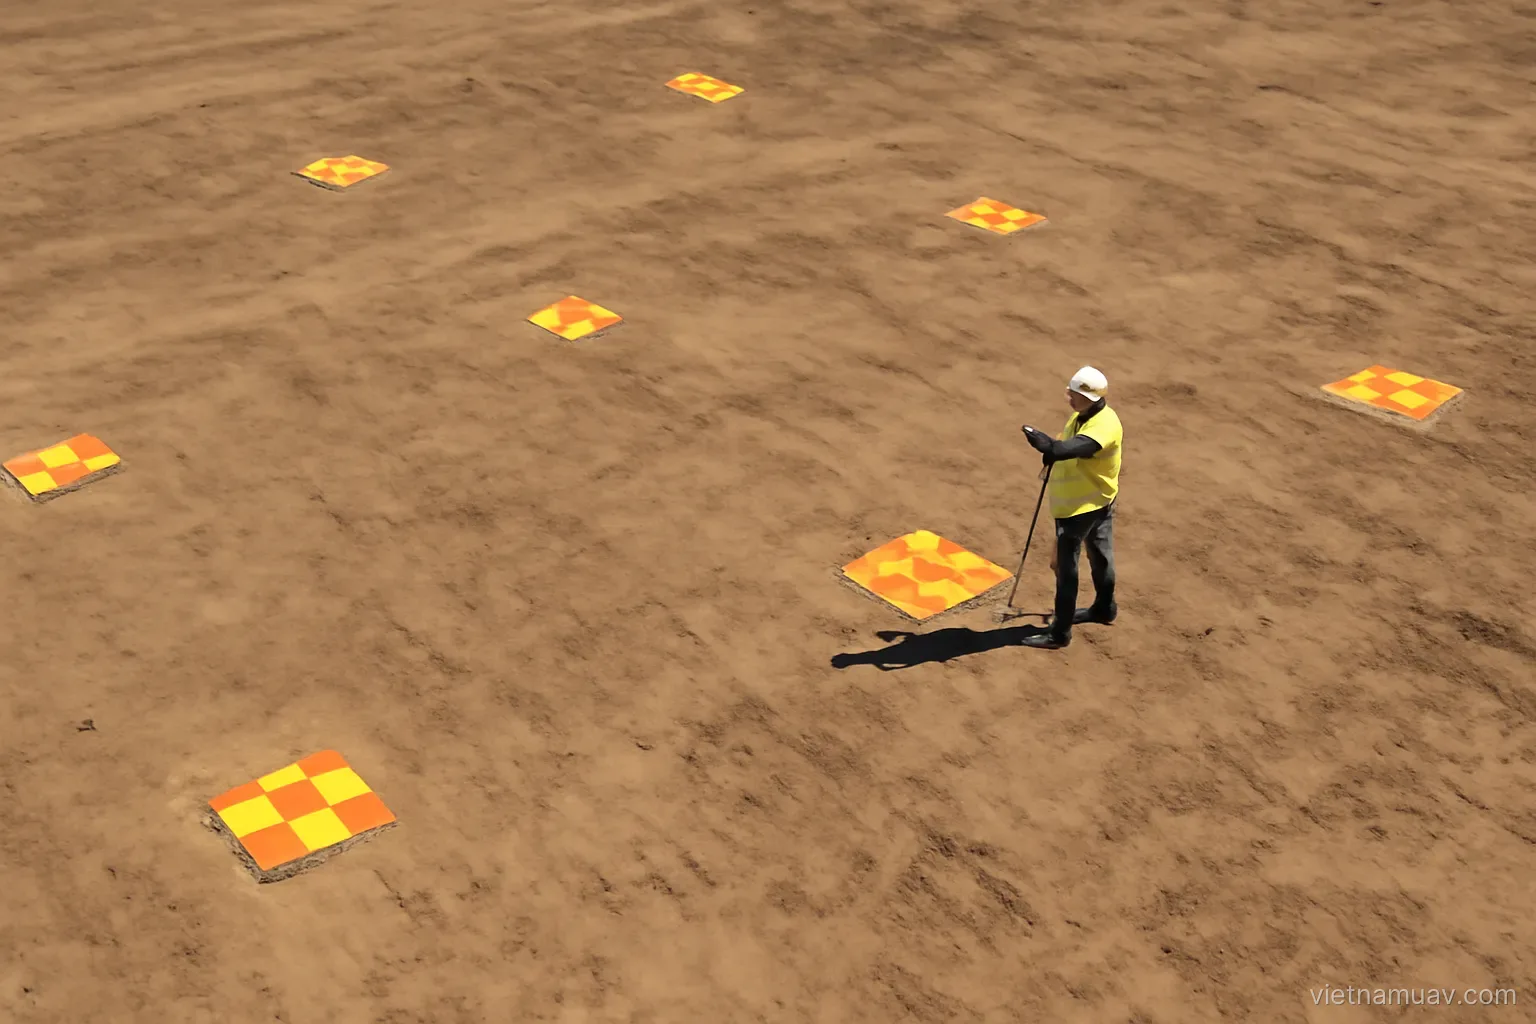
A survey flight that produces pretty orthomosaics is not the same as a survey that produces measurements you can build or invoice from. Ground control points are the foundation that transforms pixel data into real-world coordinates. This article covers how to place them, how many you need, what they actually cost in effort, and what accuracy to expect when you do it properly.
What ground control points do
GCPs anchor your images to the real world. Without them, your drone's onboard GPS gives positions accurate to within 2–5 metres. A camera mounted on the drone cannot see its own position; it sees only what is below. GCPs are physical targets on the ground whose real-world coordinates you measure with a surveying instrument. The software then uses these known points to correct the position and angle of every image.
They solve drift and tilt problems. Drone GPS drifts over time and with atmospheric conditions. Wind and compass errors introduce rotation. GCPs force the entire image set to fit the real world, not the other way around. Without them, a 100-metre line might measure 101 or 99 metres depending on where the drone flew.
Accuracy scales with GCP quality and density. A single GCP cannot correct the entire survey. Multiple GCPs spread across the area create a network that constrains the solution. Placing them only at the edges leaves the centre unsupported. Clustering them in one corner wastes their value.
They are not optional for professional work. Insurance companies, clients, and regulators expect surveys to be traceable to known reference points. A survey without GCPs is a visual record, not a legal document. If someone disputes a boundary, a volume calculation, or a progress claim, you need evidence that your measurements are tied to reality.
GCPs work best with surveying-grade GNSS or total station. Consumer GPS on a smartphone cannot measure a GCP location accurately enough. Professional work requires either a real-time kinematic (RTK) GNSS receiver or a total station. Both are capable of centimetre-level accuracy, which is the standard for construction and cadastral work.
They also work with previous survey data. If the site has existing survey marks or control points, you can use those instead of establishing new ones. This saves time and money. Always check with the local surveyor or engineer whether previous control is available.
GCP placement takes longer than the flight itself. Marking and measuring GCPs often requires a second person and more time on site than flying the drone. Budget for this in your schedule and cost estimates. Rushing GCP work is the easiest way to produce a useless survey.
Targets should be rigid and visible from above. Painted crosses fade and shift. Cloth markers blow away. Rigid targets—wooden boards, metal plates, or commercial GCP markers—stay in place and photograph consistently. A 1-metre square painted black and white is standard. Smaller targets work with high-resolution cameras; larger targets are safer on windy days.
Night work or bad light makes GCPs harder to find in images. The software must identify each GCP in each image automatically. Shadows, vegetation, and low contrast make this fail. Schedule GCP flights for clear midday conditions when targets cast minimal shadow and are easy to detect.
Removing GCPs afterwards takes time and equipment. If targets are temporary, you must return to remove them. If they are permanent (e.g. for monitoring), they become long-term site furniture. Plan whether targets stay or go before you place them.
How many GCPs and where to place them
Density depends on site size and required accuracy. A small 2-hectare site needs fewer GCPs than a 50-hectare mining area. As a practical rule, place one GCP per 5–10 hectares for general mapping, and one per 2–3 hectares for construction or engineering surveys. Irregular or steep terrain needs more density than flat ground.
Corners and edges should always have GCPs. The corners of the survey area are the most difficult for the software to constrain. At least one GCP at each corner ensures the edges align correctly. If the area is large, place an additional GCP at the midpoint of each edge.
Distribute them across the site, not in clusters. Grouping all GCPs in one zone leaves other zones unsupported. Imagine a grid overlay on your survey area. Aim to place GCPs at grid intersections, not all on one line. This lets the software correct distortion across the entire area, not just in one direction.
High ground and low ground both need coverage. If your site has a slope, place GCPs at different elevations. This helps the software understand the terrain and correct for tilt in the images. A site with only hilltop GCPs may produce warped images in the valleys.
Avoid placing all GCPs on flat, open ground. If your site is mostly building and vegetation, place at least some GCPs on hard surfaces where they will photograph clearly. Grass, mud, and loose material make it harder for the software to detect targets precisely.
Check line-of-sight from the drone camera viewpoint. A GCP hidden under a tree canopy or behind a building will not appear in the images, even if it is physically on site. Walk the area and look up. If you cannot see the target from above, the software cannot see it either.
Minimum viable survey uses four GCPs in a square pattern. This is the bare minimum for a small site. It provides one constraint point per corner. Four points define a plane; anything smaller is not a survey. Real work almost always needs more.
Mark GCPs clearly on the flight plan map. Your pilot needs to know where they are. Mark their location in the flight planning software and print it on paper. A GCP that is not visible in any image is useless. Brief the pilot on what to expect.
Use natural features as GCPs if targets are not practical. Road intersections, building corners, and utility poles can serve as GCP locations if they are clearly defined and can be measured with surveying equipment. This works for building facades and road networks but is less reliable than rigid targets.
Document GCP coordinates and their measurement method. Record latitude, longitude, and elevation for each point. Note which instrument measured it, who measured it, and when. Include this metadata in your final report. It is evidence that your survey is traceable.
Measuring GCP locations correctly
RTK GNSS is fastest and most common for GCP work. An RTK receiver gives positions accurate to 2–3 centimetres in real time. One person can measure a GCP location in seconds. RTK requires a base station (either your own or a virtual reference station via network). Many urban and developed areas have free or low-cost RTK services available.
Total station works when RTK is not available. A surveyor sets up the instrument over a known control point and sights each GCP target. Accuracy is typically 3–5 centimetres at ranges up to 500 metres. Total station is slower than RTK but works in urban canyons and forests where GNSS signals are blocked. It requires two people: one at the instrument, one at the target.
Static GNSS is reliable but takes longer. A receiver left on a GCP for 20–30 minutes gathers more signal history, which improves accuracy. This method works offline and is useful where no real-time service is available. It is not practical for many GCPs because of time cost.
Never use smartphone GPS for professional GCPs. Consumer GNSS accuracy is 5–10 metres under good conditions. This is not good enough for construction, engineering, or cadastral surveys. If you do not have RTK or total station access, you should not claim centimetre-level accuracy in your deliverables.
Measure to the centre of the target mark. If your target is a 1-metre square, the measured point should be at the geometric centre. Record this in your notes. Software will look for the exact pixel that corresponds to this point in each image.
Record instrument height if using total station. The total station measures to the prism height, not to ground level. Subtract the prism height from the recorded elevation to get the ground-level GCP coordinate. This is a common source of error if not done carefully.
Check for local magnetic declination and convergence. If your survey coordinates are in a local grid system (UTM, state plane, or cadastral grid), the angle between true north and grid north matters. This is especially important for long baselines or when comparing your survey to existing maps. Use the correct transformation between GNSS and your local system.
Measure GCPs on stable ground that will not shift. Do not place a GCP on freshly compacted fill, mud, or sand. Choose bedrock, concrete, or well-settled earth. If the ground moves between the time you measure and the time you fly, the GCP coordinates are wrong.
Photograph each GCP target with a reference object for scale. Take a ground-level photo of each target with a person or ruler nearby. This creates a visual record that helps confirm the target was correctly measured and identified later. Include these photos in your report.
Verify measurements by re-shooting at least one GCP. Set up the surveying instrument again and measure the same point a second time. If the two measurements agree to within your expected accuracy, your method is working. If they differ by more than a few centimetres, investigate why.
Accuracy expectations and what affects them
Horizontal accuracy with GCPs is typically 2–5 centimetres. This assumes you have measured the GCPs to surveying-grade accuracy and placed them densely enough across the site. Factors like image resolution, camera lens quality, and processing software all affect the final result. Do not assume you will automatically achieve 2 centimetres; that is the optimistic case.
Vertical (elevation) accuracy is usually 5–10 centimetres. Elevation is harder to measure accurately from images than horizontal position. Stereo overlap, camera angle, and GCP vertical distribution all affect it. If you need elevation to better than 10 centimetres, you need more GCPs and higher image overlap. You may also need to validate with ground measurements.
Flying at lower altitude improves accuracy but reduces coverage. A 50-metre flight captures finer detail than a 120-metre flight, but covers less area per image. The trade-off depends on what you are measuring. Small high-precision site surveys fly low. Large area mapping flies high and uses more GCPs.
Image overlap must be consistent to achieve consistent accuracy. Software assumes 80% forward overlap and 60% side overlap as standard. If your drone flight varies the overlap (due to wind, autopilot drift, or manual flying), the software will struggle. Tight, uniform overlap produces better results than loose or variable overlap.
Camera resolution and lens distortion affect precision. A 20-megapixel camera with a good lens produces sharper images than a 12-megapixel camera with a cheap lens. Sharper images let the software locate GCPs more precisely. Lens distortion (especially on very wide angles) can introduce systematic errors that are hard to correct.
Processing software quality matters more than you might think. The algorithm used to match images, locate GCPs, and solve for camera positions varies between software packages. Some packages produce tighter accuracy than others with the same input data. Expensive professional software often delivers better results than free or consumer-grade software.
Poor weather introduces noise into all measurements. High wind, rain, and dust degrade image quality. Haze and glare make GCP targets harder to detect. Fly only in calm, clear conditions if accuracy matters. Do not attempt a survey on a day when visibility is poor.
Thick vegetation can prevent accurate surveying. If your site is covered in tall grass or forest, the drone cannot see the ground. GCP targets placed on the surface may disappear under vegetation. For agricultural or forest surveys, you may need to clear small patches or use taller GCP markers.
Accuracy degrades at the edges of the survey area. The corner and edge pixels of images have more distortion than the centre. If you need high accuracy at the boundary, place GCPs right at the edge, not just near it. Avoid measuring important features near the image edges.
Validate your accuracy by comparing to independent measurements. After processing, measure a few random points with your surveying instrument and compare to the orthomosaic or point cloud. If they agree, you have evidence your survey is accurate. If they differ, investigate the GCP placement or processing parameters.
Practical workflow and common mistakes
Establish GCPs before flying, not after. Mark and measure all GCPs first, then fly the drone. This ensures the GCPs are visible in the images and you have time to fix any problems. If you fly first and then try to place GCPs, you may miss areas or place them where the camera cannot see them.
Use a checklist to confirm each GCP is measured and photographed. A simple spreadsheet with GCP name, coordinates, instrument type, date, and photo reference prevents mistakes. Check off each GCP as you complete it. Do not rely on memory; write everything down.
Mark GCP locations on an aerial photograph or map for the pilot. Print out a base map with GCP locations marked clearly. Hand this to the pilot before the flight. This ensures the pilot knows where to look and can confirm all GCPs are in the images.
Do not place GCPs in locations where they will be moved or buried. If a site is active (construction, earthwork, traffic), GCPs can be displaced. Use locations that will remain stable throughout the survey period. Temporary GCPs on construction sites should be out of the work area.
Account for coordinate system transformation in your workflow. If your GCPs are measured in WGS84 (GNSS) but the client needs UTM or a local grid, the software must apply the correct transformation. Check this carefully. A wrong transformation will shift the entire survey by hundreds of metres.
Do not mix different GCP types in one survey. If some GCPs are measured with RTK and others with total station, the software may not weight them correctly. Stick to one method if possible. If you must mix methods, document which GCPs used which method and adjust the software weighting accordingly.
Include GCP uncertainty in your final report. State the accuracy of the GCP measurements, the number of GCPs used, and the expected accuracy of the final deliverable. This is professional practice and protects you if the client later disputes the measurements.
Test your processing workflow on a small site first. Before committing to a large survey, fly and process a small area with GCPs. This reveals problems with your method, equipment, or software before you waste time on a big project.
Keep all raw data, not just the final deliverable. Archive the images, GCP coordinates, flight logs, and processing reports. If a question arises later, you need this data to explain and defend your work. Digital storage is cheap; the cost of redoing a survey is expensive.
Communicate with the client about accuracy upfront. Do not promise 2-centimetre accuracy unless you have planned GCPs, equipment, and processing to deliver it. Set realistic expectations based on site conditions, budget, and timeline. Deliver what you promised, and document how you achieved it.
Frequently asked questions
Can I do a survey without ground control points?
Yes, but the result will be a visual record, not a legal measurement. Drone GPS alone gives positions accurate to 2–5 metres. For many purposes—progress photos, volumetric estimates, visual inspection—this is acceptable. For construction claims, property boundaries, or regulatory reports, you need GCPs. Without them, your measurements cannot be verified or traced to known reference points.
How many GCPs do I actually need?
At minimum, four GCPs in a square pattern for a small site. For general work, aim for one GCP per 5–10 hectares, distributed across the site, not clustered. For construction or engineering surveys, one per 2–3 hectares is better. More GCPs improve accuracy and give you confidence. If in doubt, place more GCPs; they cost time and materials, not money.
What accuracy can I really expect after placing GCPs?
Horizontal accuracy is typically 2–5 centimetres. Vertical accuracy is usually 5–10 centimetres. This assumes surveying-grade GCP measurement, good image quality, consistent overlap, and processing with professional software. Many factors can degrade this. Always validate a sample of points after processing to confirm you achieved the expected accuracy.
Do I need RTK GNSS or is total station good enough?
Both work. RTK GNSS is faster and easier for one person but requires a base station or network connection. Total station is slower but works anywhere and is less dependent on infrastructure. Choose based on what you have access to and your site conditions. Either method, properly used, gives surveying-grade accuracy suitable for professional work.
More in Sensors and payloads and Agricultural UAV.